

Minecraft is counted among one of the popular games in the world. Released in 2011, this sandbox game has sold over 121 million copies across the globe.
The best thing about this game is that it involves activities like exploring, resource collection, arranging and combating. For many people, it is more than just a simple computer game. After all, it offers useful tools to build social skills, enhance problem-solving abilities, and improve creativity.
Since multiple users can play this game on the internet server and share their creativity it has many educational benefits too. Minecraft allows players to collaborate on a public internet server and build something bigger and do better things.

However, the one big issue with public internet server is that you can’t take control over who is you interacting with. The good news is you can avoid this by setting up your own server.
In this guide, we will make you learn how to create a Minecraft server step by step for free. So, if you are interested, continue reading this guide. But before that let’s find out why you need to build a server.
Why You Should Build a Server

Most players who are entirely new to the creative world of Minecraft, just prefer to buy the game and jump in. Some players also go for Minecraft Realms to make their own Minecraft world.
However, for those, who want to relish the complete Minecraft experience, nothing can be better than getting their own server up.
By setting up your own server you not only get the better control over every aspect of gameplay but also play by any rules you want and can install any mods you want.
Now when you are aware of the importance of setting up a Minecraft server, let’s find out how to do that.
Making of a Minecraft Server
Although it is not necessary to be an IT professional to set up your own Minecraft server, it is important that you have a good understanding of things like the configuration of your system, router, network and more importantly the command line.
In short, you should be comfortable with at least basic computer concepts and network that are crucial to launching a server. Don’t worry even if you are not – there is a way you can create a Minecraft server. You should look for hosting service and provider that can offer you adequate hand holding to set up various things even without any coding experience.
On different forums and review sites, we noticed that users recommend for www.hostinger.com/vps-host/ to set up Minecraft server. You may give it a try.
We will talk about the advantages of Minecraft hosting later. Let’s first learn how to create a Minecraft Server for free.
Install the Latest Version of Java
Make sure you have installed the latest version of Java on your machine. In order to check the version, access the Control panel of your Windows. Find Java under programs and then click on Update Now.
Next, open the Command prompt and type in java -version. Now you should be able to see Java version you have. Once you know what type of Java version you have, go to their website to see whether or not you have the latest version. If it is outdated, download the latest version from there.
Choose a Location for Minecraft Server Files
Before you download server software, it is important that you choose where on your computer you would like to run the server from.
When you run a server for the first time, it creates some config files. It is always a good choice to organize these files in one particular place. It can be anything like your desktop, document folder, etc.
Download Minecraft Server Software

You can download server software straight from the official website of Minecraft. This server software comes with a .jar file that is Java. As soon as it gets downloaded, start the server by making a double click on this .jar file.
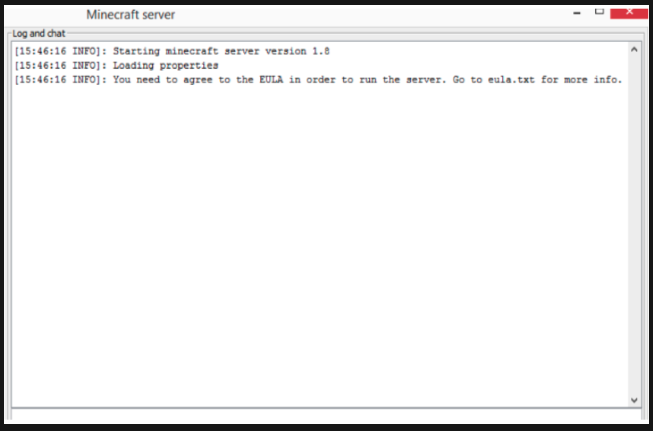
At this stage, you will see several configuration files have built that you need to modify (before your server is ready).
Next, you need to Acknowledge the End User and accept it. It should be a eula.txt file. You can open this file using any of the text editor tools. Now look for where it is written eula=false. You have to set this ” =” to true.
Since it is an important step to start Minecraft server you shouldn’t skip it.
In case you see error i.e. “Can’t save server properties”, run Minecraft server as an admin. In order to do that, make the right click on the .jar file and choose the “Run as administrator”.
Mac users can download the software from the same link. Open a TextEdit program and set the format to simply plain text before typing in the following.
Don’t forget to replace “server filename” with the actual server file name.
Now, save this file as start.command in the similar folder as your .jar file. Next, access your terminal and give permission to this new start. command file so that you can run it.
In your terminal, type chmod a+x.
Now drag this file and drop it into the terminal window followed by pressing Enter.
Allow Port Forwarding
In case you want to host the server for players on the just local network, you don’t require to worry about this step. However, if you want to make your server attainable by anyone around the world, validate port forwarding on your router.
If you don’t know how to do that you can refer router’s documentation. You will require to forward TCP port 25565 for Minecraft. In addition to this, you will also need to add local IP address of your server as output IP. It will allow port forwarding.
Start with Your Server
Finally, you have reached the last step. In order to start the server, open your command prompt again. Start the server by typing in:
java -Xmx1024M -Xms1024M -jar{server file name}nogui
Note: you have to put your actual server file name in the place of Server file name.
Mac users who want to start their server should double click on the start. command file from the previous step.
Why Choose Minecraft Hosting
There are two major issues with making your own server for Minecraft.
Complicated Technical Process – You must have knowledge of command lines.
Server Down- When your computer is off people will not be able to login to your server.
Therefore, sometimes people see Minecraft hosting a good option instead of making everything on their computer. With a reputable hosting provider, setting up various things will be much easier and your server will not stop even if your PC is not on.
Final Words
We hope now you know how to make Minecraft server for free. Again we would say if you are not comfortable setting up the server by on your own, take help of a good hosting provider. This way you will get an increased accessibility.
At this end, it is you who have to make the decision. We hope our guide has been helpful for you. What is your preferred way of setting up a Minecraft server? Kindly let us know in the following comment section.
